Eh yes – just recompiled the thing. Looks like it works now.
CRM 2011/2015 Distribute Workflow Activity
Enjoy!
I thought I share, since this took some time to investigate.
- I have a “Full Name”, “Last Name” and “First Name” fields
- I have a workflow that is triggered on Last and First name changes
- The workflow updates “Full Name” by concatenating First and Last with a space between
- In the Quick Find View, I am including “First Name” and “Full Name” as search field.
All works, until you try to search. If you have “John Smith” and you search “John” or “Smith” you get a hit, but when you search for “John S” you get nothing. This drove me CRAZY for a week, until, by exporting to Excel, I was able to see that the space that was inserted by the workflow was not a space at all but a nbsp, and that does not match “space”.
There are many solutions to this problem, but they all have drawbacks. I should also note that this behaviour only appeared in CRM 2013/2015 and in the olden times it was possible to concatenate fields in workflows with spaces in between. I suspect that this is a side effect of a bug that was reported in this very forum (workflow was stripping all spaces).
Forewarned is forearmed.
The CRM 2011 Views and Filters Toolkit Codeplex project is now up to its 7th release.
The release contains one additional tool: DeleteSystemView, which allows to delete a System View with less hassle than with DeploySystemView. Thanks to Latho for pointing out how unpractical it is to use DeploySystemView for deletions.
New: to simplify installation, this release provides a managed and unmanaged solution file in addition to the assemblies.
You can find more information on how to use the toolkit by clicking on the Views Toolkit category of the blog.
Alberto “Viewplex” Gemin
CRM 2011 Views and Local Data Groups – Part IV: Filter Templates
This article completes the series on Local Data Group management related to the CRM 2011 Views and Filters Toolkit. Here we’ll see how to deploy and instantiate filter templates for Outlook users. You can find more information about the toolkit by selecting the Views Toolkit Category of this blog. For a detailed discussion about Filters and Templates see this article.
Note
The examples shown below refer to Outlook Offline capabilities; they can be extended to the online case with minimal modifications. This note applies to this article as well.
Introduction
The default filter template for offline accounts is a query called My Accounts. This implies that by default, when a user is using the CRM Outlook client offline, they will see only accounts that they own.
Since My Accounts is a default filter template, it will exist as a template and as a filter deployed for each user. We can verify this by running the following two queries:
The first query shows the filter template:
SELECT SavedQueryId, Name, QueryType, IsDefault FROM SavedQuery
WHERE ReturnedTypeCode = 1 AND QueryType = 8192
| SavedQueryId | Name | QueryType | IsDefault |
| 31089FD8-596A-47BE-9C9C-3FF82C7A8F8C | My Accounts | 8192 | 1 |
The second query shows the actual filter deployed to the CRM Administrator. Note the ParentQueryId pointing back to the filter template above:
SELECT OwnerIdName, Name, QueryType, ParentQueryId FROM UserQuery
WHERE ReturnedTypeCode = 1 AND QueryType = 16
| OwnerIdName | Name | QueryType | ParentQueryId |
| CRM Administrator | My Accounts | 16 | 31089FD8-596A-47BE-9C9C-3FF82C7A8F8C |
Changing the default behaviour by modifying Filter Templates
We want to change the default behaviour of CRM by creating a default filter template that allows offline users to see all accounts, not only the ones they own.
To do so, we’ll take an already existing view (Active Accounts) and redeploy it as a filter template. This is done below in multiple steps for clarity, but it could be consolidated into just one workflow process.
Step 1: Deploying a Filter Template
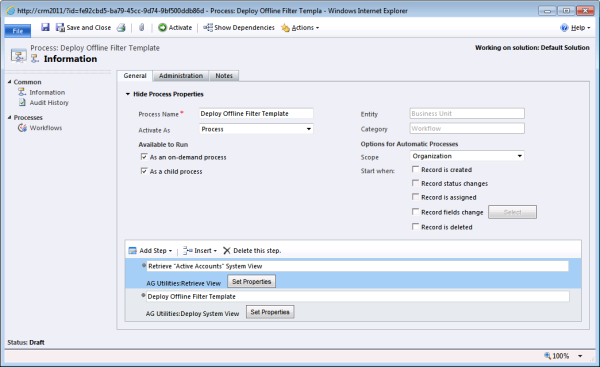
First let’s deploy an offline filter template called Outlook Accounts by creating a workflow called Deploy Offline Filter Template, as shown in the figure below. Note that all workflows in this example are based on Business Unit, but they could be based on any entity.
The workflow is composed of two steps:
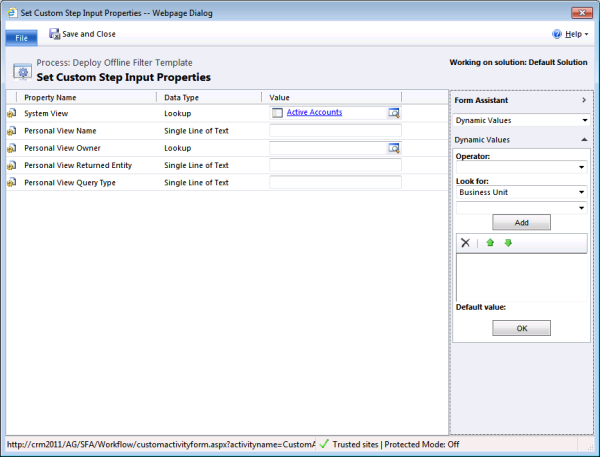
Retrieve Active Accounts System View
This step uses the RetrieveView custom activity to retrieve the Active Accounts system view definition. I’ve specified the following parameters:
Deploy Offline Filter Template
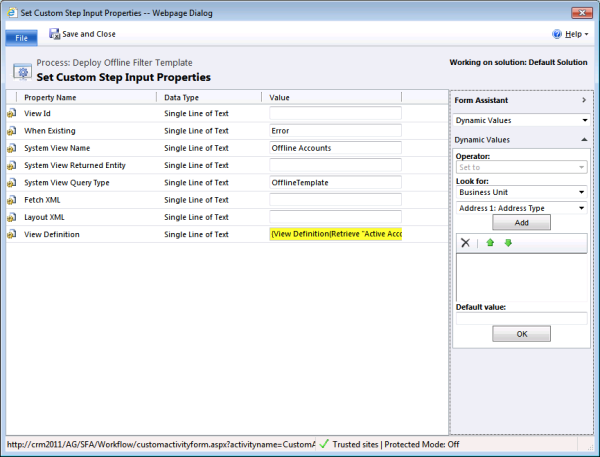
This step uses the DeploySystemView custom activity with the following parameters:
I’ve set only four parameters, which are:
- When Existing: Error — This means that if the destination view already exists, the activity will fail. See the documentation in Codeplex for other possible values of this parameter.
- System View Name: Offline Accounts — This overrides the name of the view when deployed. If left blank, this would be the same name of the view in the View Definition parameter, which in this case is Active Accounts.
- System View Query Type: OfflineTemplate — This is the type of the view when deployed. Since I want to deploy a filter template for offline synchronization, this must be either OfflineTemplate or 8192. For a list of all view types see here.
- View Definition: View Definition(Retrieve “Active Accounts” System View) — This is the actual definition of the view, which is set to the output parameter of the RetrieveView activity.
Verify
Now select the record relative to the Business Unit or organisation you want to affect, and run the Deploy Offline Filter Template Workflow.
If the workflow completed successfully, you will have a new template called Offline Accounts, and you can verify this by running the following query:
SELECT SavedQueryId, Name, QueryType, IsDefault FROM SavedQuery
WHERE ReturnedTypeCode = 1 AND QueryType = 8192
| SavedQueryId | Name | QueryType | IsDefault |
| 9953EFEE-8FD5-E011-84D2-0800277B84F8 | Offline Accounts | 8192 | 0 |
| 31089FD8-596A-47BE-9C9C-3FF82C7A8F8C | My Accounts | 8192 | 1 |
Now we have a new Filter Template that we can manually deploy to users (using the InstantiateFilter activity, see below for an example). However, since this template is not the default template for Accounts, when new users are created it will not be deployed by default.
Step 2: Set a Filter Template as Default
Let’s now see how we can change which Filter Template gets deployed automatically when new users are created. We want to change the default and have the newly created Offline Accounts template set as default, so that an Offline Accounts filter is deployed to new users instead than a My Accounts filter.
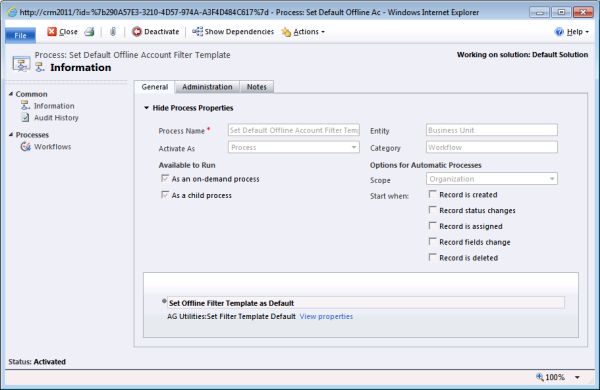
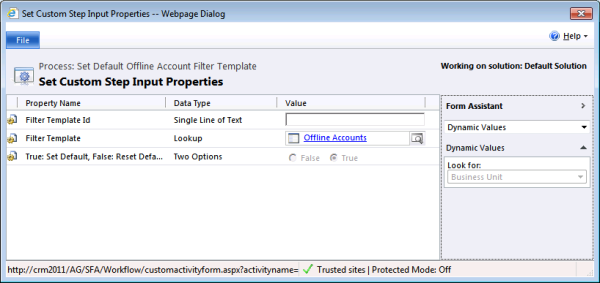
To do so, I’ve created a workflow called Set Default Offline Account Filter Template, as shown in the figure below:
The workflow is composed of just one step:
Set Offline Filter Template as Default
This step uses the SetFilterTemplateDefault custom activity. I’ve specified the following parameters:
I’ve set two parameters, which are:
- Filter Template – This is the template we want to set as default.
- True: Set Default, False: Reset Default – This is quite self-explanatory I hope.
Verify
Now select the record relative to the Business Unit or organisation you want to affect, and run the Set Default Offline Account Filter Template Workflow.
If the workflow completed successfully, the Offline Accounts template will be now the default template for offline accounts, and you can verify this by running the same query we executed before:
SELECT SavedQueryId, Name, QueryType, IsDefault FROM SavedQuery
WHERE ReturnedTypeCode = 1 AND QueryType = 8192
| SavedQueryId | Name | QueryType | IsDefault |
| 9953EFEE-8FD5-E011-84D2-0800277B84F8 | Offline Accounts | 8192 | 1 |
| 31089FD8-596A-47BE-9C9C-3FF82C7A8F8C | My Accounts | 8192 | 0 |
Now the Offline Accounts Filter Template will be deployed by default to new users. However, what about existing users? Bear with me…
Step 3: Instantiate Filter Template
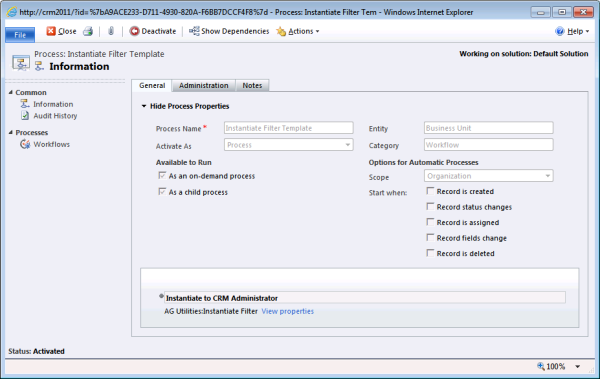
The workflow Instantiate Filter Template shown in the figure below can be used to manually instantiate a filter to a user from a template:
The workflow is composed of just one step:
Instantiate to CRM Administrator
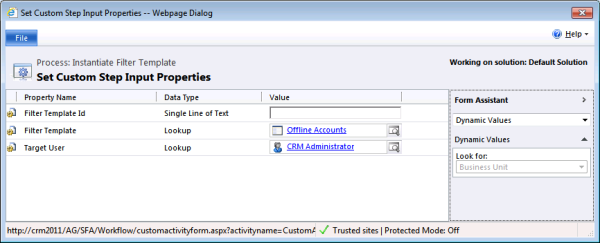
This step uses the InstantiateFilter custom activity. I’ve specified the following parameters:
I’ve set two parameters, which are:
- Filter Template – This is the template we want to set as default.
- Target User – The user we want to instantiate the filter to.
Verify
Now select the record relative to the Business Unit or organisation you want to affect, and run the Instantiate Filter Template Workflow.
If the workflow completed successfully, the Offline Accounts filter will now be deployed to CRM Administrator, and you can verify this by running the following:
SELECT OwnerIdName, Name, QueryType, ParentQueryId FROM UserQuery
WHERE ReturnedTypeCode = 1 AND QueryType = 16
| OwnerIdName | Name | QueryType | ParentQueryId |
| CRM Administrator | Offline Accounts | 16 | 9953EFEE-8FD5-E011-84D2-0800277B84F8 |
| CRM Administrator | My Accounts | 16 | 31089FD8-596A-47BE-9C9C-3FF82C7A8F8C |
Step 4: Reset Default Filters
One more thing: the process shown above is not the only way to instantiate filters. The CRM 2011 Views and Filters Toolkit contains another useful custom activity: ResetUserFilters will reset all filters for a particular user to their defaults. An example on how to do this can be found here: Reset User Filters with the Views and Filters Toolkit.
Can you guess what happens to our example scenario if you run the activity on the CRM Administrator? Right, the old default filter goes away:
SELECT OwnerIdName, Name, QueryType, ParentQueryId FROM UserQuery
WHERE ReturnedTypeCode = 1 AND QueryType = 16
| OwnerIdName | Name | QueryType | ParentQueryId |
| CRM Administrator | Offline Accounts | 16 | 9953EFEE-8FD5-E011-84D2-0800277B84F8 |
Conclusions
We’ve come a long way tinkering with Local Data Groups, Filters and Templates. The process certainly helped me to understand in detail how this functionality works in CRM 2011. Hopefully you found a source of useful information somewhere buried in all these posts.
Alberto “Filter-no-more” Gemin
Browse CRM data with Microsoft Pivot
Have you ever used Microsoft Pivot? Thinking of marrying its powerful visualisation capabilities to your CRM data and SharePoint images? Start here: pinpoint.microsoft.com.
We built a complete solution to integrate Pivot into CRM 2011. The only thing you need to provide is the images. Pivot can be applied to any entity in CRM, be they users, opportunities, accounts, or custom entities. Scenarios include sales (visualize the performance of your sales team, analyze revenue by account, etc.), marketing (browse through your product catalogue or brochures), and any other custom scenario, especially when your solution includes integration with media libraries (such as the out-of-the-box integration with SharePoint).
The solution includes automatic batch processing for the generation of collections and DeepZoom tiles from any CRM entity (system or custom), configurable facets, visibility rules consistent with CRM’s privileges configuration, all this with a simple installation process, completely reversible and delivered as a managed CRM solution file.
Let me know if you or one of your clients is interested.
Alberto “Infusionite” Gemin
Base Currency Format String in CRM 2011
 One more utility about getting number formats in CRM 2011.
In this case the function below (in conjunction with the GetNumberFormatString function described in this post here), will return the format string for currency for the organization.
Note that this is the format for the base currency of the organization. Other cases can be derived quite simply from this example.
using Microsoft.Xrm.Sdk.Workflow;
using System.Activities;
using System;
using Microsoft.Xrm.Sdk;
using Microsoft.Xrm.Sdk.Query;

namespace Test
{
    class Test
    {
        public static string GetBaseCurrencyFormat(CodeActivityContext executionContext)
        {
            IWorkflowContext workflowContext = executionContext.GetExtension();
            Guid orgId = workflowContext.OrganizationId;
            IOrganizationServiceFactory svcFactory = executionContext.GetExtension();
            IOrganizationService svc = svcFactory.CreateOrganizationService(workflowContext.UserId);

            ColumnSet colSet = new ColumnSet("basecurrencyid", "currencydisplayoption", "currencyformatcode",
                "negativecurrencyformatcode", "numbergroupformat");
            Entity organization = svc.Retrieve("organization", orgId, colSet);

            Guid baseCurrencyId = ((EntityReference)organization.Attributes["basecurrencyid"]).Id;
            int currencyDisplayOption = ((OptionSetValue)organization.Attributes["currencydisplayoption"]).Value;
            int currencyFormatCode = ((OptionSetValue)organization.Attributes["currencyformatcode"]).Value;
            int negativeCurrencyFormatCode = (int)organization.Attributes["negativecurrencyformatcode"];
            string numberGroupFormat = (string)organization.Attributes["numbergroupformat"];

            colSet = new ColumnSet("currencyprecision", "currencysymbol", "isocurrencycode");
            Entity currency = svc.Retrieve("transactioncurrency", baseCurrencyId, colSet);

            int currencyPrecision = (int)currency.Attributes["currencyprecision"];
            string currencySymbol = (string)currency.Attributes["currencysymbol"];
            string isoCurrencyCode = (string)currency.Attributes["isocurrencycode"];

            return GetNumberFormatString(currencyPrecision, numberGroupFormat, negativeCurrencyFormatCode, true,
                currencyDisplayOption == 0 ? currencySymbol : isoCurrencyCode, currencyFormatCode);
        }
        (...)
Happy coding!
Alberto “Form-idable” Gemin
Format Strings in CRM and fn_GetNumberFormatString surrogate
 If you need to format numbers in plugins in the same way that CRM does, you will likely benefit of the code below. This is especially useful for Currencies, since although CRM calculates the format of currency fields based on the user or system settings, there is no direct method to get the format from the API.
What you will find below is a direct re-implementation of the fn_GetNumberFormatString SQL function that CRM uses to render the number format in Filtered Views. The input parameters are quite self explanatory, in your code you can retrieve them from the user settings or the organization settings, depending on whether you are displaying user or system wide information.
public static string GetNumberFormatString(int precision, string numberGroupFormat,
    int negativeFormatCode, bool isCurrency, string currencySymbol = "",
    int currencyformatcode = 0)
{
    string precisionString = string.Empty;
    switch (precision)
    {
        case 1:
            precisionString = ".0";
            break;
        case 2:
            precisionString = ".00";
            break;
        case 3:
            precisionString = ".000";
            break;
        case 4:
            precisionString = ".0000";
            break;
        case 5:
            precisionString = ".00000";
            break;
    }

    string positiveNumberFormat = null;
    switch (numberGroupFormat)
    {
        case "3,0":
            positiveNumberFormat = "##########,##0" + precisionString;
            break;
        case "3,2":
            positiveNumberFormat = "##,##,##,##,##,##0" + precisionString;
            break;
        default:
            positiveNumberFormat = "###,###,###,##0" + precisionString;
            break;
    }

    string zeroNumberFormat = "0" + precisionString;

    string negativeNumberFormat = null;
    if (isCurrency)
    {
        switch (negativeFormatCode)
        {
            case 0:
                negativeNumberFormat = "(\"" + currencySymbol + "\"" + (char)8203 + positiveNumberFormat + ")";
                break;
            case 1:
                negativeNumberFormat = "-\"" + currencySymbol + "\"" + (char)8203 + positiveNumberFormat;
                break;
            case 2:
                negativeNumberFormat = "\"" + currencySymbol + "\"-" + positiveNumberFormat;
                break;
            case 3:
                negativeNumberFormat = "\"" + currencySymbol + "\"" + (char)8203 + positiveNumberFormat + "-";
                break;
            case 4:
                negativeNumberFormat = "(" + positiveNumberFormat + (char)8203 + "\"" + currencySymbol + "\")";
                break;
            case 5:
                negativeNumberFormat = "-" + positiveNumberFormat + (char)8203 + "\"" + currencySymbol + "\"";
                break;
            case 6:
                negativeNumberFormat = positiveNumberFormat + "-\"" + currencySymbol + "\"";
                break;
            case 7:
                negativeNumberFormat = positiveNumberFormat + (char)8203 + "\"" + currencySymbol + "\"-";
                break;
            case 8:
                negativeNumberFormat = "-" + positiveNumberFormat + (char)160 + "\"" + currencySymbol + "\"";
                break;
            case 9:
                negativeNumberFormat = "-\"" + currencySymbol + "\"" + (char)160 + positiveNumberFormat;
                break;
            case 10:
                negativeNumberFormat = positiveNumberFormat + (char)160 + "\"" + currencySymbol + "\"-";
                break;
            case 11:
                negativeNumberFormat = "\"" + currencySymbol + "\"" + (char)16 + positiveNumberFormat + "-";
                break;
            case 12:
                negativeNumberFormat = "\"" + currencySymbol + "\" -" + positiveNumberFormat;
                break;
            case 13:
                negativeNumberFormat = positiveNumberFormat + "- \"" + currencySymbol + "\"";
                break;
            case 14:
                negativeNumberFormat = "(\"" + currencySymbol + "\"" + (char)160 + positiveNumberFormat + ")";
                break;
            case 15:
                negativeNumberFormat = "(" + positiveNumberFormat + (char)160 + "\"" + currencySymbol + "\")";
                break;
            default:
                negativeNumberFormat = "(\"" + currencySymbol + "\"" + (char)8203 + positiveNumberFormat + ")";
                break;
        }

        switch (currencyformatcode)
        {
            case 0:
                positiveNumberFormat = "\"" + currencySymbol + "\"" + (char)8203 + positiveNumberFormat;
                zeroNumberFormat = "\"" + currencySymbol + "\"" + (char)8203 + zeroNumberFormat;
                break;
            case 1:
                positiveNumberFormat = positiveNumberFormat + (char)8203 + "\"" + currencySymbol + "\"";
                zeroNumberFormat = zeroNumberFormat + (char)8203 + "\"" + currencySymbol + "\"";
                break;
            case 2:
                positiveNumberFormat = "\"" + currencySymbol + "\"" + (char)160 + positiveNumberFormat;
                zeroNumberFormat = "\"" + currencySymbol + "\"" + (char)160 + zeroNumberFormat;
                break;
            case 3:
                positiveNumberFormat = positiveNumberFormat + (char)160 + "\"" + currencySymbol + "\"";
                zeroNumberFormat = zeroNumberFormat + (char)160 + "\"" + currencySymbol + "\"";
                break;
            default:
                positiveNumberFormat = "\"" + currencySymbol + "\"" + positiveNumberFormat;
                zeroNumberFormat = "\"" + currencySymbol + "\"" + zeroNumberFormat;
                break;
        }
    }
    else
    {
        switch (negativeFormatCode)
        {
            case 0:
                negativeNumberFormat = "(" + positiveNumberFormat + ")";
                break;
            case 1:
                negativeNumberFormat = "-" + positiveNumberFormat;
                break;
            case 2:
                negativeNumberFormat = "-" + (char)160 + positiveNumberFormat;
                break;
            case 3:
                negativeNumberFormat = positiveNumberFormat + "-";
                break;
            case 4:
                negativeNumberFormat = positiveNumberFormat + (char)160 + "-";
                break;
            default:
                negativeNumberFormat = "(" + positiveNumberFormat + ")";
                break;
        }
    }

    return positiveNumberFormat + ";" + negativeNumberFormat + ";" + zeroNumberFormat;
}
Happy coding!
Alberto “Form-over-function” Gemin
CRM 2011 Views and Local Data Groups – Part III: Deploying System Filters
Continuing the series of articles related to the CRM 2011 Views and Filters Toolkit, this article shows how to deploy system-wide filters for Outlook users. You can find more information about the toolkit by selecting the Views Toolkit Category of this blog. For a detailed discussion about Filters and Templates see this article.
Note
This note applies to this article as well.
Introduction
By default, CRM synchronises My Contacts to Outlook. Users can create additional filters to expand the range of contacts that they synchronise, but it is possible to do this across the board (i.e. for all users), and the quickest way to accomplish this is by creating a System Filter.
Outlook Contacts View
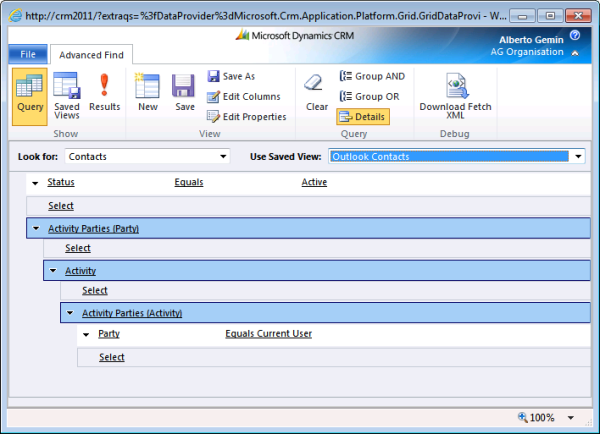
Let’s start by logging in as the CRM Administrator and by creating a personal view called Outlook Contacts; this view shows all active contacts that a user has interacted with (i.e. for whom there are related activities that are also related to them).
See the picture below for the filter conditions:
Make sure you save the view and remember its name because we’ll use it later.
Deploy System Outlook Filter Workflow
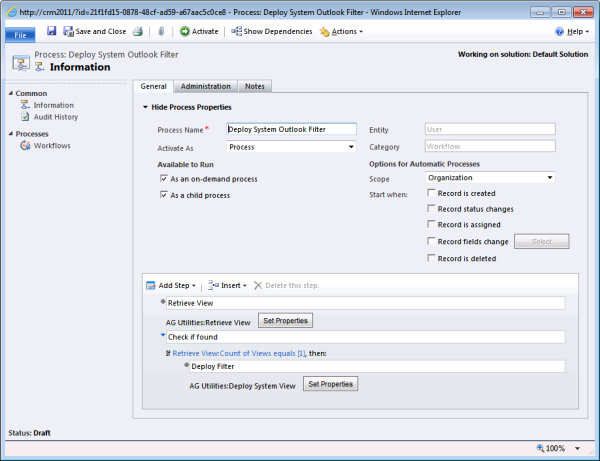
Next we’ll create a workflow based on User, called Deploy System Outlook Filter, as shown in the figure below:
Note that the workflow could run on any entity; it is just for convenience that I’ve chosen the User entity.
The workflow is composed of three steps:
Retrieve view
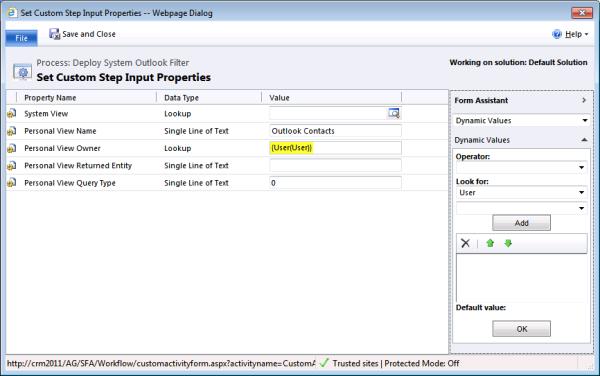
This step uses the RetrieveView custom activity to retrieve the Outlook Contacts personal view definition. I’ve specified the following parameters:
The activity will search for a personal view named Outlook Contacts owned by the user the workflow is running on (which will then have to be the CRM Administrator), and of type 0 (zero). Type 0 (zero) corresponds to type MainApplicationView, as referenced here. Note that I could have entered MainApplicationView instead than 0, the code interprets both names and numeric values when specifying a type.
Check if found
The RetrieveView custom activity has a return parameter called Count of Views which tells how many views were found. Before proceeding I should make sure that one view (and one only) was found:
Deploy Filter
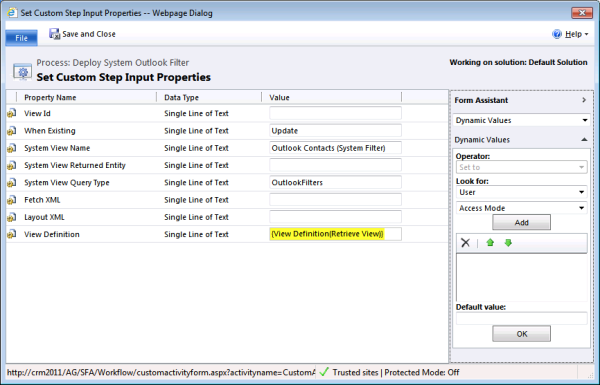
This last step uses the DeploySystemView custom activity with the following parameters:
I’ve set four parameters, which are:
- When Existing: Update – This means that if the destination view already exists, the activity will overwrite it. See the documentation in Codeplex for other possible values of this parameter.
- System View Query Type: OutlookFilters – This is the type of the view when deployed. Since I want to deploy a system filter for outlook synchronization, this must be either OutlookFilters or 256. For a list of all view types see here.
- System View Name: Outlook Contacts (System Filter) – This overrides the name of the view when deployed. If left blank, this would be the same name of the view in the View Definition parameter, which in this case is Outlook Contacts.
- View Definition: View Definition(Retrieve View) – This is the actual definition of the view, which is set to the output parameter of the RetrieveView activity.
Test
Now select the record relative to the user that owns the Outlook Contacts personal view (in this example the CRM Administrator), and run the Deploy System Outlook Filter Workflow.
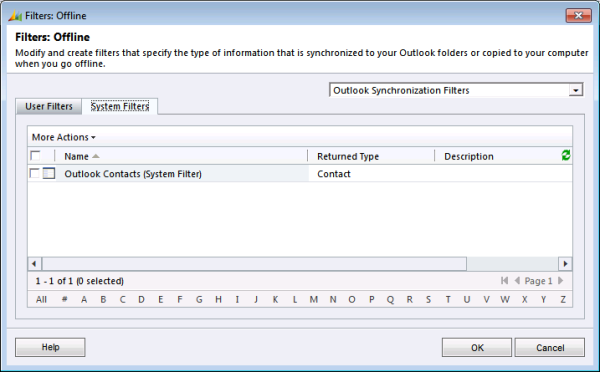
If the workflow completed successfully, users will see the following screen when looking at the synchronisation settings from within their CRM Outlook Client:
This means that in addition to their custom rules for synchronisation of contacts, which include by default My Contacts, all users will synchronise contacts that are returned by the query we’ve just deployed.
Conclusions
This was a walk-through of how to deploy a system filter without coding, and with the help of the CRM 2011 Views and Filters Toolkit. Note that this example can be also applied to System Offline Filters. The only change needed is to specify OfflineFilters query type instead than OutlookFilters in the DeploySystemView activity.
Alberto “Contact the Filter” Gemin
CRM 2011 – Offline and Outlook Filters and Templates: Local Data Groups
Introduction
The way in which CRM controls what users download to their online and offline Outlook clients has been improved with the 2011 version, as you can read here. However, in my opinion some of this functionality is not immediately clear. This article is meant to provide a complement to the MSDN article cited above by explaining these features in more detail.
In the next article we’ll see how the CRM 2011 Views and Filters Toolkit can be used to perform tasks related to Filters and Templates, as well as to access some of the functionality that until now was only available through the CRM API.
Some Terminology
In the context of this article there are four terms that, in various combinations, mean different things. Let’s note down few facts about each to act as reference while looking at the functionality. The terms are Outlook, Offline, Filter and Template.
Outlook
This term refers to synchronization capabilities of the CRM Outlook Client when it’s online. The standard Outlook Client is always online. The Offline Outlook Client is online when the user has pressed the “Go Online” button.
Offline
This term refers to synchronization capabilities of the CRM Outlook Client when it’s offline. The standard Outlook Client can never be offline. The Offline Outlook Client is offline when the user has pressed the “Go Offline” button.
Filter
A filter is a query that CRM uses to determine what data should be synchronized between the CRM server and the Outlook Client. Filters can be of two types: System Filters and User Filters.
Template
This is a template query that can be instantiated as a User Filter for a particular user.
Synchronising Data: Filters
Outlook vs. Offline
Outlook synchronizes only few entities when online, such as contacts, appointments, tasks etc. If the user has installed the Offline CRM Client, Outlook synchronizes much more data than just contacts and activities when going offline. In theory one could choose to have the whole database available offline, which would give an offline user the ability to access the same set of data as if they were working online.
To decide what to synchronise in both scenarios, i.e. to determine Local Data Groups, CRM relies on filters, which are called Outlook Filters or Offline Filters depending on whether they apply to when Outlook is online or offline respectively. In addition, each filter can be a System or User filter.
System vs. User Filters
System Filters are stored in the SavedQueryBase table and they are valid for all users. User Filters are stored in the UserQueryBase table and they apply only to their owner. Think of this difference as the difference between a System View and a Personal View.
Users are empowered to maintain their User Filters, as described here, but only administrators can maintain System Filters. In addition, administrators can control the deployment of User Filters via the template mechanism discussed later in this article.
Filter Types
To recap, the following table shows all available filter types and their main attributes.
| On / Off | S / U | QueryType | Table | Description |
| Online | System | OutlookFilters (256) | SavedQueryBase | Determines which data to synchronise when online. Applies to all users. |
| Offline | System | OfflineFilters (16) | SavedQueryBase | Determines which data to synchronise when offline. Applies to all users. |
| Online | User | OutlookFilters (256) | UserQueryBase | Determines which data to synchronise when online. Applies to one user only. |
| Offline | User | OfflineFilters (16) | UserQueryBase | Determines which data to synchronise when offline. Applies to one user only. |
A consideration related to the table above is that the QueryType attribute is technically not the same for all filters, since filters can be either savedquery or userquery CRM entities, depending on whether they are System or User Filters respectively.
Therefore, the QueryType attribute can be of type SavedQueryQueryType or UserQueryQueryType. The two are not equivalent: you can find the definition of the two types here and here.
Filter Templates
As explained above, users are empowered to maintain their User Filters, but administrators can control the deployment of User Filters via Filter Templates.
Filter Templates are queries that can be instantiated as User Filters. Templates reside in the SavedQueryBase table (the instantiated User Filters are of course in the UserQueryBase table). Each User Filter record contains a reference back to the filter in the UserQueryId.ParentQueryId attribute.
Like Filters, Templates can be for offline or online synchronisation, as shown in the table below.
| On / Off | QueryType | Table | Description |
| Online | OutlookTemplate (131072) | SavedQueryBase | Instantiates a corresponding User Filter of type OutlookFilters. |
| Offline | OfflineTemplate (8192) | SavedQueryBase | Instantiates a corresponding User Filter of type OfflineFilters. |
A Filter Template can be manually instantiated as a User Filter through a call to the InstantiateFiltersRequest request.
Default Filter Templates
A template can be marked as default by setting its SavedQuery.IsDefault attribute.
Each entity can have only one filter template that is marked as default. If you create a custom entity, and set the IsAvailableOffline property, a default filter template is created automatically.
When new users are added to the system, all templates marked with the IsDefault attribute will cause User Filters to be instantiated to those users automatically.
In addition, all User Filters can be manually reset (which includes re-instantiating all the applicable templates) through the ResetUserFiltersRequest request.
Example
To see how the considerations above translate into reality, get your hands on a CRM 2011 instance and run the following query:
SELECT
      SavedQueryId, Name, Description, QueryType, IsDefault
FROM
      SavedQuery
WHERE
      QueryType IN (131072, 8192) AND ReturnedTypeCode = 2
If the default configuration has not been modified extensively, the query should return the following results:
| SavedQueryId | Name | Description | QueryType | IsDefault |
| 65D2CBA8-EEDA-4419-B03B-D9C2D8272E51 | My Contacts | Contacts owned by me | 8192 | 1 |
| 58DC4BEE-60B7-4A84-987F-800296B71404 | My Outlook Contacts | Contacts Syncing to Outlook | 131072 | 1 |
You can see that there are two Filter Templates for contacts in the SavedQueryBase table: one for Online and one for Offline filters.
If you look in the UserQueryBase table for a particular user:
SELECT TOP 2
      Name, Description, QueryType, ParentQueryId
FROM
      UserQuery
WHERE
      QueryType IN (256, 16) AND ReturnedTypeCode = 2
ORDER BY OwnerIdName
You should get the following results:
| Name | Description | QueryType | ParentQueryId |
| My Outlook Contacts | Contacts Syncing to Outlook | 256 | 58DC4BEE-60B7-4A84-987F-800296B71404 |
| My Contacts | Contacts owned by me | 16 | 65D2CBA8-EEDA-4419-B03B-D9C2D8272E51 |
Each filter in the table above is an instance of its corresponding template, as confirmed by the fact that the ParentQueryId attribute points back to the template.
Conclusions
Hopefully this article sheds some light into Filters, Templates and how they are related to Local Data Groups.
The next article will show how the CRM 2011 Views and Filters Toolkit can be used to perform complex tasks related to Filters and Templates, as well as to access some of the functionality that until now was only available through the API.
Alberto “Templet” Gemin

